Drywall damage is an inevitable part of homeownership. Whether it's from moving furniture, accidental impacts, settling foundations, or everyday wear and tear, holes and cracks in your walls are frustrating but fixable. Understanding how to properly repair drywall—from small nail holes to larger damage—can save you hundreds of dollars in professional repair costs while keeping your home looking pristine.
This comprehensive guide covers everything you need to know about drywall repair, including how to assess damage, choose the right repair method, match existing textures, and achieve a professional-looking finish that blends seamlessly with your walls.
Understanding Drywall Damage: Assessment Before Repair
Before diving into repairs, it's important to understand what type of damage you're dealing with and whether it's something you can tackle yourself or requires professional attention.
Types of Common Drywall Damage:
Small Holes and Dents (Less than 1 inch):
- Nail or screw holes from removed pictures or shelves
- Small dings from doorknobs or furniture
- Minor surface damage that doesn't penetrate completely through
Medium Holes (1-6 inches):
- Doorknob holes from doors without stoppers
- Accidental impacts from moving furniture
- Removed electrical boxes or fixtures
- Pet damage or child-related impacts
Large Holes (6 inches or more):
- Major impacts or accidents
- Removed wall-mounted items with extensive anchoring
- Damage from plumbing or electrical work
- Structural issues or water damage
Cracks:
- Settling cracks at corners or ceiling joints
- Stress cracks around doors and windows
- Seam cracks where drywall sheets meet
- Spider web cracking from impacts
When DIY Makes Sense vs. When to Call Professionals
Not all drywall damage should be approached as a DIY project. Understanding your limitations can save time, money, and frustration.
Good Candidates for DIY Repair:
- Isolated small to medium holes in accessible locations
- Cosmetic damage with no underlying structural issues
- Cracks caused by normal settling (not ongoing movement)
- Repairs in low-visibility areas where you can practice technique
- Situations where you have adequate time for multiple coats and drying
Situations Requiring Professional Help:
- Water damage or mold presence (these indicate larger problems)
- Extensive cracking suggesting structural issues
- Damage to textured ceilings (particularly popcorn ceilings with potential asbestos)
- Multiple large repairs throughout the home
- Damage in high-visibility areas where perfect results matter
- Situations requiring matching complex textures or specialty finishes
- Repairs needed near electrical or plumbing systems
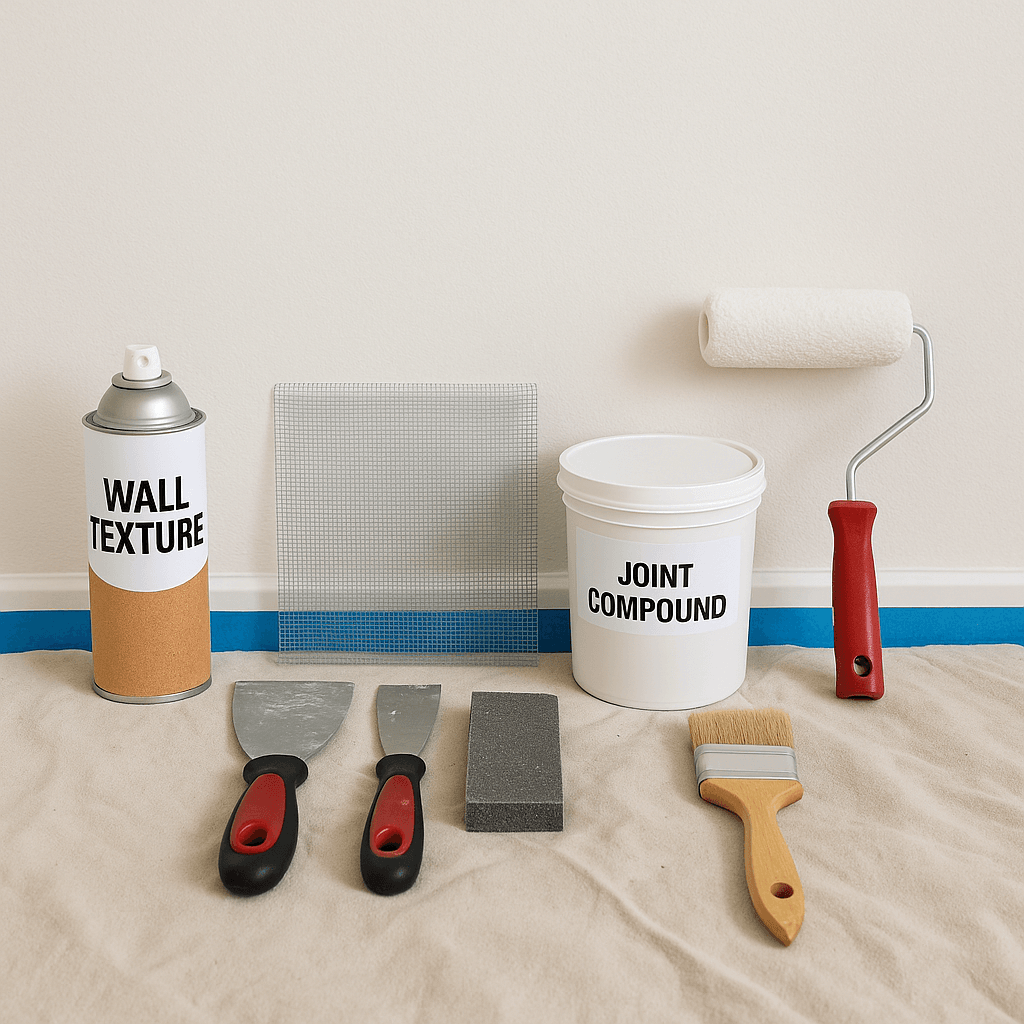
Essential Tools and Materials for Drywall Repair
Having the right supplies before you start makes the repair process significantly smoother.
Basic Tool Kit:
- Drywall knives in multiple sizes (4-inch, 6-inch, and 10-inch putty knives)
- Utility knife with fresh blades
- Drywall saw or keyhole saw
- Sanding sponges (medium and fine grit)
- Sandpaper (120-150 grit)
- Measuring tape and pencil
- Straight edge or T-square
- Drop cloths
- Painter's tape
- Shop vacuum or dust collection
Materials Needed:
- Joint compound (pre-mixed is easiest for beginners)
- Drywall patches (various sizes)
- Mesh tape for medium holes
- Paper drywall tape for large repairs
- Drywall screws (if doing large repairs)
- Primer (drywall-specific or PVA primer)
- Matching paint
- Texture spray (if matching textured walls)
Optional but Helpful:
- Corner bead (for corner repairs)
- Setting-type joint compound (for faster repairs)
- Dust mask or respirator
- Work light for seeing imperfections
- Drywall repair clips (for large holes without stud access)
Step 1: Workspace Preparation
Proper preparation makes the repair process cleaner and more efficient.
Protect Your Space:
- Move furniture away from the work area or cover with drop cloths
- Lay protective covering on floors (drywall dust is fine and travels easily)
- Use painter's tape to protect baseboards, door frames, and adjacent surfaces
- Ensure adequate ventilation, especially when sanding
- Have cleaning supplies ready (drywall dust requires more than just sweeping)
Prepare the Damaged Area:
- Remove any loose drywall material around the damage
- Clean away dust and debris
- Check behind the wall for any underlying issues (moisture, wiring, etc.)
- Ensure the area is completely dry before beginning repairs
Step 2: Patching Small Holes and Dents
Small imperfections are the easiest and quickest repairs, typically taking just a few hours including drying time.
For Nail or Screw Holes:
- Remove any protruding nails or anchors
- Lightly sand around the hole to remove any raised edges
- Apply lightweight spackle or joint compound with a small putty knife
- Smooth it flush with the wall surface, removing excess compound
- Allow to dry completely (usually 1-2 hours)
- Lightly sand smooth
- Wipe away dust with a damp cloth
- Prime and paint to match
For Small Dents (Less than 1 inch):
- Clean the dented area of any loose paper or material
- Apply a thin layer of joint compound with a 4-inch knife
- Feather the edges outward to blend with the surrounding wall
- Let dry, then check for shrinkage (compound shrinks as it dries)
- Apply additional thin coats if needed, allowing each to dry
- Sand smooth once completely dry
- Prime and paint
Common Mistakes with Small Repairs:
- Applying too much compound at once (causes long drying times and cracking)
- Not feathering edges properly (creates visible bumps)
- Painting without priming (causes "flashing" where the repair shows through)
- Over-sanding (exposes the paper face of the drywall)
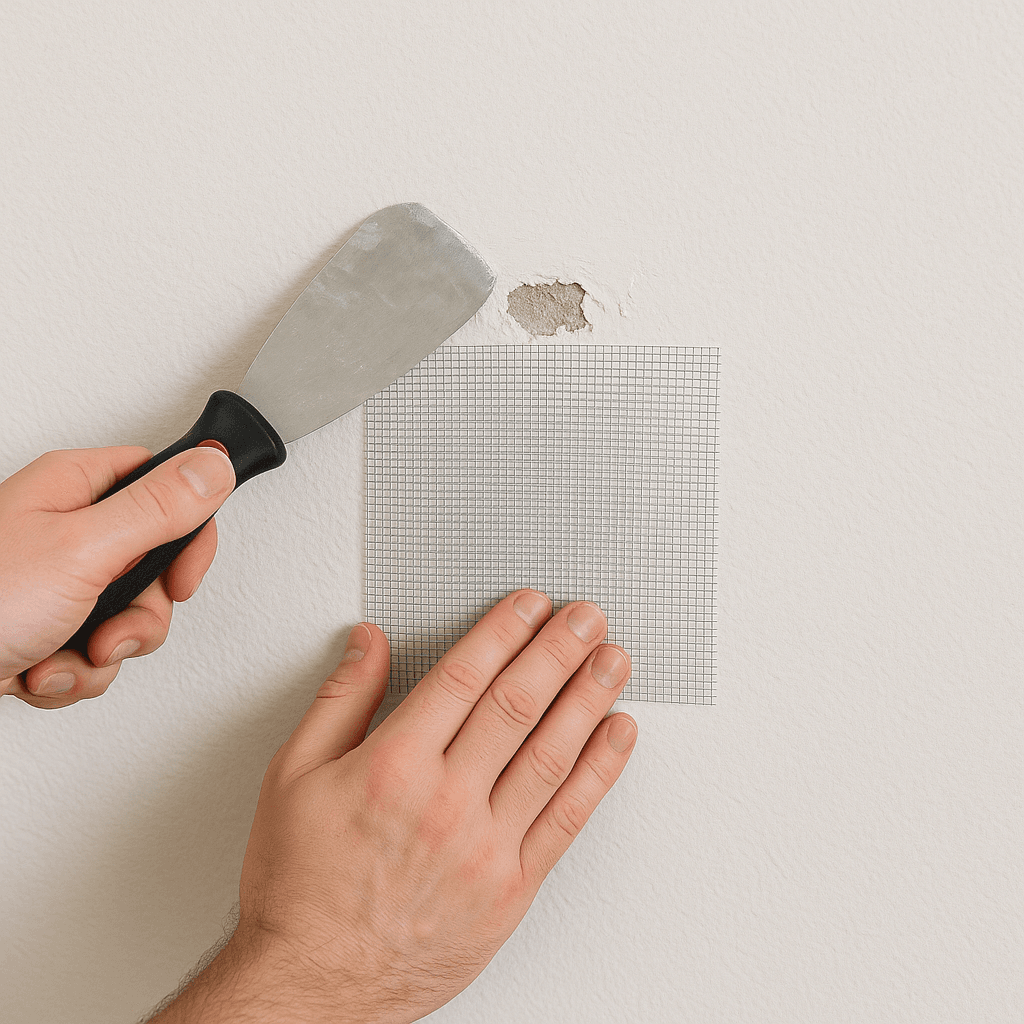
Step 3: Repairing Medium-Sized Holes
Holes between 1-6 inches require more technique but are still manageable for most DIYers.
Using Mesh Patches:
- Clean the damaged area, removing all loose material
- Ensure the hole edges are stable and well-attached
- Select a self-adhesive mesh patch slightly larger than the hole
- Center the patch over the hole and press firmly to adhere
- Apply a thin coat of joint compound over the entire patch with a 6-inch knife
- Extend the compound 2-3 inches beyond the patch edges, feathering outward
- Let dry completely (typically 6-8 hours or overnight)
- Lightly sand the surface
- Apply a second coat, extending even further for smooth blending
- Allow to dry and sand again
- Apply a final skim coat if needed for perfect smoothness
- Prime and paint
Alternative Method - California Patch:
For holes where mesh might not provide enough support:
- Cut a piece of drywall slightly larger than the hole
- On the back side, score and break away the edges, leaving only the face paper extending
- This creates a "patch with wings" of paper
- Apply joint compound around the hole
- Press the patch into place, with the paper wings adhered to the wall surface
- Apply compound over the entire patch, feathering edges
- Multiple thin coats provide better results than one thick application
- Sand, prime, and paint when complete
Why Multiple Thin Coats Work Better:
- Each layer bonds better to the previous layer
- Thin coats dry faster and more evenly
- Less shrinkage and cracking
- Easier to achieve a smooth finish
- Better control over the final texture
Step 4: Large Hole Repair
Holes larger than 6 inches typically require cutting back to studs and installing new drywall.
The Process:
-
Cut a Clean Opening:
- Use a utility knife or drywall saw to cut a rectangular or square opening around the damage
- Extend cuts to the center of wall studs on either side (use a stud finder)
- Make clean, straight cuts for easier patching
-
Prepare Support:
- If studs aren't available on both sides, install backing boards
- Secure 1x3 or 2x4 furring strips behind the opening edges using drywall screws
- Ensure backing is flush with the existing drywall
-
Cut and Install Patch:
- Measure the opening precisely
- Cut a new drywall piece to fit (cut slightly undersized for easier fitting)
- Test fit the patch before applying fasteners
- Secure with drywall screws every 6-8 inches into studs or backing
- Screw heads should be slightly below surface but not breaking the paper face
-
Tape the Seams:
- Apply paper drywall tape over all seams
- Embed the tape in a thin layer of joint compound
- Smooth with a 6-inch knife, removing excess compound
- Allow to dry completely
-
Apply Multiple Coats:
- First coat: Cover tape with joint compound using a 6-inch knife
- Second coat: Extend coverage wider with an 8-10 inch knife, feathering edges
- Third coat: Final skim coat for smooth blending with a 10-12 inch knife
- Each coat must dry completely before the next (24 hours between coats)
- Sand lightly between coats to remove ridges
-
Final Sanding:
- Once fully dry, sand the entire repair area smooth
- Use a work light held at an angle to spot imperfections
- Wipe away all dust before priming
Important Considerations:
- Large repairs take time—rushing leads to visible results
- Properly embedded tape prevents future cracking
- Wider feathering on each coat makes repairs less noticeable
- The patch should be completely invisible before painting
Step 5: Matching Wall Texture
Smooth walls are straightforward—just sand until flush. Textured walls require additional steps to blend the repair.
Common Wall Textures:
Orange Peel (Light Splatter Texture):
- Most common in homes built after 1990
- Resembles the skin of an orange with fine, even bumps
- Created by thinned joint compound applied with spray gun or roller
Knockdown:
- Similar to orange peel but flattened
- Texture is sprayed then lightly smoothed with a trowel
- Creates random, organic patterns
Skip Trowel:
- Hand-applied with a trowel in sweeping motions
- More pronounced than knockdown
- Shows trowel marks and intentional patterns
Popcorn (Acoustic Texture):
- Common in older homes (pre-1990)
- Very bumpy, three-dimensional texture
- May contain asbestos in pre-1980 homes (professional testing recommended)

Matching Orange Peel Texture:
- Purchase aerosol texture spray from hardware stores
- Practice on cardboard until you match the pattern
- Hold can 12-24 inches from wall (distance affects texture size)
- Apply in light coats, building up to match surrounding texture
- Let dry completely before painting
- Avoid over-spraying or texture will be too heavy
Matching Knockdown Texture:
- Apply orange peel texture first (aerosol or thinned compound)
- Wait 10-15 minutes for partial drying
- Lightly drag a clean drywall knife across the peaks to flatten
- Work in random directions to match surrounding pattern
- Don't apply too much pressure or you'll remove all texture
- Allow to dry completely
Matching Complex Textures:
For skip trowel or other hand-applied patterns:
- Practice technique on scrap material first
- Use similar tools as the original application
- Match the direction and pressure of the original texture
- This requires skill—consider professional help for prominent areas
Texture Application Tips:
- Always test on scrap material before applying to your wall
- Texture is easier to add than remove
- Lighting affects how texture appears—check at different times of day
- Slight imperfections are less noticeable once painted
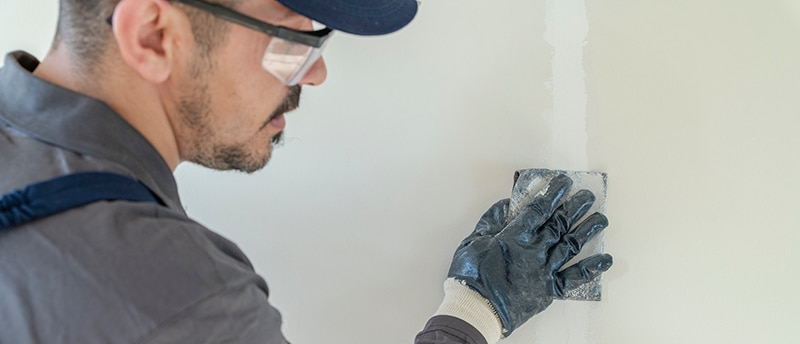
Step 6: Sanding and Smoothing
Proper sanding is what separates amateur repairs from professional-looking results.
Sanding Technique:
- Check Dryness: Ensure all compound is completely dry (usually 24 hours)
- Use Proper Grit: Start with 120-grit for heavy material removal, finish with 150-grit
- Work Systematically: Sand in circular motions or long, even strokes
- Feel the Surface: Run your hand over the area to detect imperfections
- Use Proper Lighting: A work light held at an angle reveals high spots and ridges
- Don't Over-Sand: Stop when flush with surrounding wall—over-sanding exposes tape or paper
Managing Dust:
- Drywall dust is extremely fine and travels throughout your home
- Use a sanding sponge instead of paper for less dust
- Wet sanding (for small areas) eliminates dust but takes longer to dry
- A shop vacuum with HEPA filter helps contain dust
- Keep doors closed to other rooms
- Change HVAC filters after sanding projects
After Sanding:
- Vacuum the repair area thoroughly
- Wipe walls with a damp cloth to remove all dust
- Allow walls to dry completely before priming
- Ensure no residue remains (residue prevents proper paint adhesion)
Step 7: Priming and Painting
Many DIYers skip priming, resulting in visible repairs even after painting. Proper priming and painting are essential final steps.
Why Primer Is Essential:
- Seals the porous joint compound
- Prevents "flashing" (where repairs show through paint)
- Ensures even paint absorption
- Improves paint adhesion
- Reduces number of paint coats needed
Priming Process:
-
Choose the right primer:
- PVA (polyvinyl acetate) primer for new drywall and repairs
- Stain-blocking primer if covering stains or marks
- Same sheen as your existing wall paint
-
Apply primer:
- Brush or roll primer over the repaired area
- Extend 6-12 inches beyond the repair
- Allow to dry completely per manufacturer instructions (usually 1-4 hours)
Painting for Invisible Repairs:
-
Use paint that matches your existing wall:
- If possible, use leftover paint from original application
- Match sheen carefully (flat, eggshell, satin, semi-gloss)
- Different sheens reflect light differently and will show repairs
-
Application technique:
- Apply paint over primed repair area
- Feather edges into surrounding wall using a light touch
- Don't overwork the paint or it will show lap marks
- Multiple thin coats blend better than one heavy coat
-
Allow proper drying:
- Wait full drying time between coats
- Inspect in different lighting conditions
- Apply additional coats until repair disappears
Touch-Up Challenges:
Even with perfect technique, touch-ups sometimes show because:
- Original paint has aged and changed color slightly
- New paint hasn't cured to its final color yet
- Different application method (brush vs. original roller)
- Sheen differences are magnified by light
For best results in high-visibility areas, consider painting the entire wall rather than just touching up the repair.
Common Drywall Repair Mistakes and How to Avoid Them
Learning from common errors saves time and frustration:
Mistake: Rushing Between Coats
- Problem: Applying compound over wet compound causes cracking and poor adhesion
- Solution: Wait full 24 hours between coats, even if surface feels dry
Mistake: Using Too Much Compound
- Problem: Thick applications take forever to dry and often crack
- Solution: Multiple thin coats always produce better results
Mistake: Poor Feathering
- Problem: Abrupt edges create visible ridges
- Solution: Extend each coat progressively wider, blending seamlessly
Mistake: Inadequate Sanding
- Problem: Bumps and ridges show through paint
- Solution: Use proper lighting and feel the surface; sand until completely smooth
Mistake: Skipping Primer
- Problem: Repairs flash through paint, remaining visible
- Solution: Always prime repairs before final painting
Mistake: Wrong Texture Application
- Problem: Mismatched texture draws attention to repair
- Solution: Practice on scrap material until you match existing texture
Mistake: Painting Too Soon
- Problem: Moisture in compound prevents proper paint adhesion
- Solution: Ensure complete dryness (compound should be bright white, not gray)
Understanding Drying Times
One of the most common reasons for failed repairs is impatience. Different materials require different drying times:
Joint Compound (Pre-Mixed):
- Thin coat: 2-6 hours
- Standard coat: 12-24 hours
- Thick application: 24-48 hours
- Factors: Humidity, temperature, ventilation, thickness
Setting-Type Compound:
- Available in various setting times (20, 45, 90 minutes)
- Hardens through chemical reaction, not just drying
- Useful for faster repairs but requires experience
- Cannot be rehydrated once set
Primer:
- Water-based: 1-4 hours
- Oil-based: 8-24 hours
- Follow manufacturer specifications
Paint:
- Dry to touch: 1-4 hours
- Dry for recoat: 2-6 hours
- Full cure: 14-30 days
Climate matters: High humidity slows drying significantly, while low humidity and good air circulation speed the process.
Preventing Future Drywall Damage
While repairs are manageable, prevention is always easier:
- Install door stoppers to prevent doorknob holes
- Use appropriate wall anchors for heavy items
- Avoid hanging heavy objects on drywall without proper support
- Address foundation settling issues promptly
- Repair minor cracks before they expand
- Maintain proper humidity levels (extreme changes cause cracking)
- Be cautious when moving furniture near walls
- Consider corner guards in high-traffic areas
Conclusion
Drywall repair is one of the most valuable DIY skills a homeowner can develop. With proper technique, patience, and attention to detail, you can repair most common drywall damage and achieve professional-looking results. The key factors for success are: using multiple thin coats rather than thick applications, allowing adequate drying time between steps, proper sanding technique, and never skipping the primer.
While many drywall repairs are well-suited for DIY, some situations—such as extensive damage, water-related issues, or repairs in highly visible areas—benefit from professional expertise. Knowing when to tackle a project yourself and when to call for help is an important part of home maintenance.
For homeowners throughout the Seattle area—including Redmond, Bellevue, Sammamish, Issaquah, Renton, Maple Valley, and surrounding communities—professional drywall repair services can handle everything from small patches to complete wall restoration. Experienced professionals have the tools, materials, and techniques to match any texture and ensure repairs are completely invisible.
Need help with drywall repair, texture matching, or professional painting? Stanis LLC Handyman & General Contractor provides comprehensive drywall services across the greater Seattle area. Whether you're dealing with minor damage or extensive repairs, our team ensures your walls look flawless. Contact us at contact@handymanst.com for expert drywall repair and finishing services.